How to Successfully Add a Roof Awning: A Step-by-Step DIY Guide for Homeowners
Adding a roof awning to your home can enhance your outdoor living space, increase property value, and provide essential protection from the elements. This step-by-step DIY guide equips homeowners with the necessary knowledge to achieve a successful installation.
Why Install a Roof Awning?
Before diving into the installation process, it is essential to understand the benefits of a roof awning.
- Sun Protection: Awnings shield outdoor areas from sun exposure, reducing heat and glare inside your home.
- Rain Shielding: They keep furniture and outdoor spaces dry during rainfall.
- Enhanced Aesthetic: Awnings can elevate the visual appeal of your home.
- Increased Energy Efficiency: By blocking direct sunlight, awnings can contribute to decreased air conditioning costs.
Choosing the Right Awning
Selecting the correct awning involves careful consideration of materials, styles, and sizes.
Types of Awnings
1. **Retractable Awnings:** Ideal for versatility, as they can be extended or retracted based on weather conditions.
2. **Fixed Awnings:** Permanent structures that provide constant coverage.
3. **Freestanding Awnings:** Ideal for patios or decks, offering flexible placement away from the house.
Materials
Common materials for awning construction include:
– Aluminum: Durable and low-maintenance, suitable for various weather conditions.
– Fabric: Provides excellent sun protection but may require more upkeep.
– Polycarbonate: Lightweight and weather-resistant, great for areas with intense sunlight.
Gathering Your Tools and Materials
Preparation is crucial for the success of your DIY awning project. Gather the necessary tools and materials:
- Tools:
- Drill
- Screws
- Level
- Measuring tape
- Ladder
- Stud finder
- Materials:
- Awnings kit (purchased according to your specifications)
- Supporting brackets
- Sealant (if applicable)
Planning the Installation Location
Effective installation depends on proper planning. Select the best location for your awning considering:
– Sun and shade patterns.
– Access to outdoor furniture or activities.
– Visibility from inside the home.
– Clearance from any obstacles, such as electrical lines or neighboring structures.
Step-by-Step Installation Guide
The following steps outline the process of installing a roof awning effectively.
Step 1: Measure and Mark
Utilize the measuring tape to determine the desired awning width and length. Mark these measurements on the wall where the awning will be installed. Ensure that your markings are level for a uniform appearance.
Step 2: Locate the Studs
Scan for wooden studs behind your home’s siding using a stud finder. Mark these locations; this is where you will secure the brackets for your awning, ensuring strong support.
Step 3: Install the Supporting Brackets
Align the supporting brackets with your marked stud locations. Use a level to ensure the brackets are straight. Secure them to the wall using appropriate screws, ensuring they penetrate into the studs for added stability.
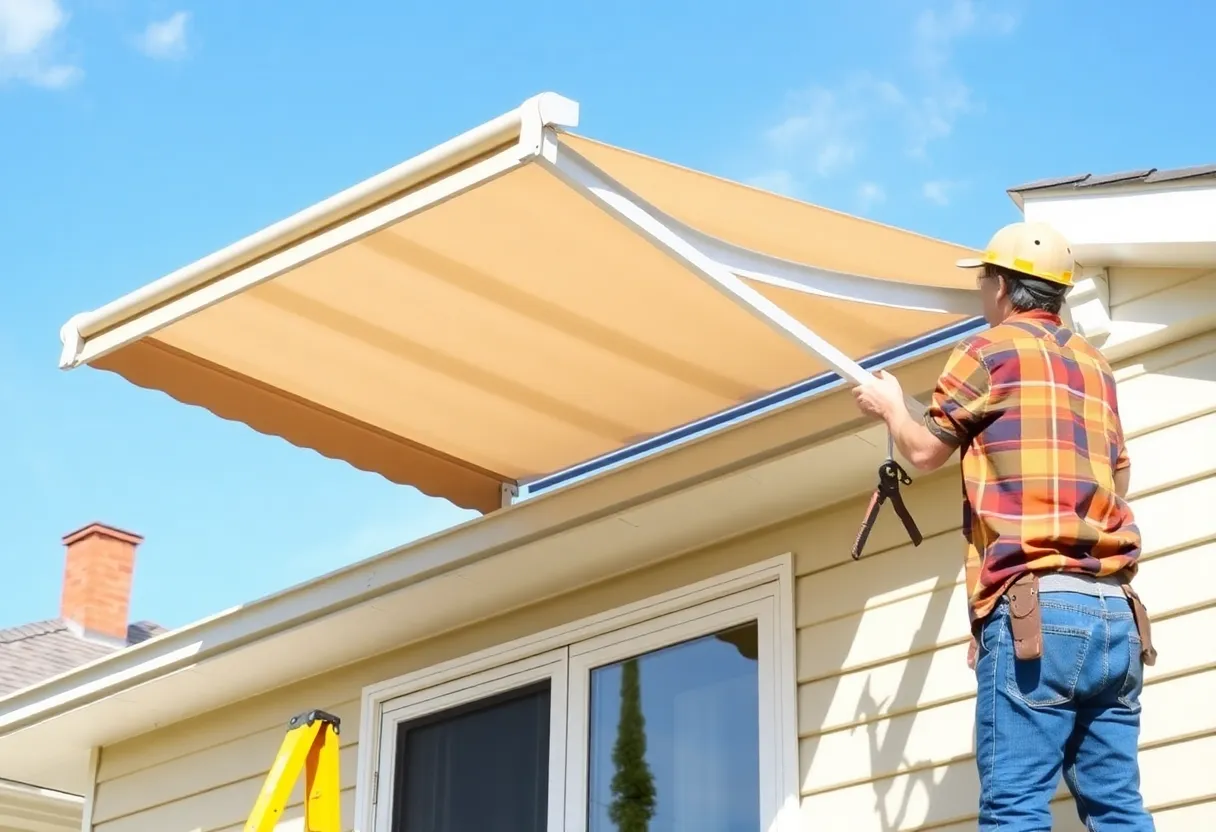
Step 4: Attach the Awning
Follow the manufacturer’s instructions for attaching the awning to the installed brackets. This generally involves lifting the awning into place and securing it through pre-drilled holes in the bracket.
Step 5: Ensure Proper Alignment
Check the awning for correct alignment. Ensure it sits level and is securely held by the brackets. Make adjustments as necessary.
Step 6: Seal and Finish
If applicable, use sealant around the edges to prevent water infiltration. Clean the area around the awning to maintain the tidiness of your installation.
Safety Considerations
DIY awning installation necessitates caution. Pay heed to the following safety tips:
– Use a sturdy ladder to avoid falls.
– Ensure proper lifting techniques to prevent injury.
– Wear protective gear, such as gloves and safety glasses, especially when working with tools.
Maintenance Tips for Your Awning
To extend the lifespan of your roof awning, adhere to these maintenance guidelines:
- Regular Cleanings: Remove dirt and debris using a soft brush or cloth.
- Inspect for Damage: Check for signs of wear or damage at least twice a year.
- Close Awning When Not in Use: Especially for retractable awnings, this can prevent weather-related wear.
Conclusion
Successfully adding a roof awning enhances the comfort and aesthetics of your home. By following this step-by-step guide, homeowners can take pride in their DIY project—creating a pleasant outdoor space while adding value to their property.
Remember to consult with local building codes and ordinances as needed, and don’t hesitate to seek assistance if any aspect of the installation seems overwhelming.
Embarking on this project not only improves your home’s exterior but also enriches your outdoor experiences.
Author: STAFF HERE HILTON HEAD
The HILTON HEAD STAFF WRITER represents the experienced team at HEREHiltonHead.com, your go-to source for actionable local news and information in Hilton Head Island, Beaufort County, and beyond. Specializing in "news you can use," we cover essential topics like product reviews for personal and business needs, local business directories, politics, real estate trends, neighborhood insights, and state news affecting the area—with deep expertise drawn from years of dedicated reporting and strong community input, including local press releases and business updates. We deliver top reporting on high-value events such as the RBC Heritage golf tournament, Hilton Head Island Wine & Food Festival, and the Gullah Celebration. Our coverage extends to key organizations like the Hilton Head Island-Bluffton Chamber of Commerce and Community Foundation of the Lowcountry, plus leading businesses in tourism and hospitality that power the local economy such as Sea Pines Resort and Sonesta Resort Hilton Head Island. As part of the broader HERE network, including HEREAiken.com, HEREBeaufort.com, HEREChapin.com, HERECharleston.com, HEREClinton.com, HEREColumbia.com, HEREGeorgetown.com, HEREGreenwood.com, HEREGreenville.com, HEREHiltonHead.com, HEREIrmo.com, HEREMyrtleBeach.com, HERENewberry.com, HERERockHill.com, and HERESpartanburg.com, we provide comprehensive, credible insights into South Carolina's dynamic landscape.